Ready to deploy that app you’ve just “dockerized”? Here’s all you need to know about Kubernetes deployments to deliver your containers to production.
Editor’s note: This is a guest article by Jérôme Petazzoni, a former Docker engineer, speaker and creator of container.training.
One of the first Kubernetes commands that we learn and use is kubectl run. Folks who have experience with Docker tend to compare it to docker run, and think: “Ah, this is how I can simply run a container!“
As it turns out, when one uses Kubernetes:
Let’s look at what happens after running a very basic kubectl run command:
$ kubectl run web --image=nginx
deployment.apps/web created
Alright! Then we check what was created on our cluster, and …
$ kubectl get all
NAME                       READY     STATUS    RESTARTS   AGE
pod/web-65899c769f-dhtdx   1/1       Running   0          11s

NAME                 TYPE        CLUSTER-IP   EXTERNAL-IP   PORT(S)   AGE
service/kubernetes   ClusterIP   10.96.0.1    <none>        443/TCP   46s

NAME                  DESIRED   CURRENT   UP-TO-DATE   AVAILABLE   AGE
deployment.apps/web   1         1         1            1           11s

NAME                             DESIRED   CURRENT   READY     AGE
replicaset.apps/web-65899c769f   1         1         1         11s
$
Instead of getting a container, we got a whole zoo of unknown beasts:
- a deployment (called
webin this example), - a replicaset (
web-65899c769f), - a pod (
web-65899c769f-dhtdx).
Note: we can ignore the service named kubernetes in the example above; that one already did exist before our kubectl run command.
I just wanted a container! Why do I get three different objects?
In short, these Kubernetes objects ensure that you can progressively deploy, roll back and scale your applications without downtime.
This is the kind of situation where at first glance, we wonder “what’s the point?“, but once we get the full picture, we’ll understand the role and purpose of each component.
In fact, a lot of people end up thinking that if we had been tasked with designing the system, they would have come up with something quite similar!
Continuous integration gives you confidence in your code. To extend that confidence to the release process, your deployment operations need to come with a safety belt.
Containers and pods
In Kubernetes, the smallest unit of deployment is not a container; it’s a pod. A pod is just a group of containers (it can be a group of one container) that run on the same machine, and share a few things together.
For instance, the containers within a pod can communicate with each other over localhost. From a network perspective, all the processes in these containers are local.
But we can never create a standalone container: the closest we can do is create a pod, with a single container in it.
That’s what happens here: when we tell Kubernetes, “create me some NGINX!“, we’re really saying, “I would like a pod, in which there should be a single container, using the nginx image.“
# pod-nginx.yml
# Create it with:
#    kubectl apply -f pod-nginx.yml
apiVersion: v1
kind: Pod
metadata:
  name: web
spec:
  containers:
    - image: nginx
      name: nginx
      ports:
        - containerPort: 80
          name: http
Alright, then, why don’t we just have a pod? Why the replica set and deployment?
Declarative vs imperative
Kubernetes is a declarative system (by opposition to imperative systems). This means that we can’t give it orders. We can’t say, “run this container.” All we can do, is describe what we want to have, and wait for Kubernetes to take action to reconcile what we have, with what we want to have.
In other words, we can say, “I would like a 40-feet long blue container with yellow doors“, and Kubernetes will find such a container for us. If it doesn’t exist, it will build it; if there is already one but it’s green with red doors, it will paint it for us; if there is already a container of the right size and color, Kubernetes will do nothing, since what we have already matches what we want.
In software container terms, we can say, “I would like a pod named web, in which there should be a single container, that will run the nginx image.“
If that pod doesn’t exist yet, Kubernetes will create it. If that pod already exists and matches our spec, Kubernetes doesn’t need to do anything.
With that in mind, how do we scale our web application, so that it runs in multiple containers or pods?
Replica sets make scaling pods easy
If all we have is a pod, and we want more identical pods, all we can do is get back to Kubernetes, and ask it, “I would like a pod named web2, with the following specification: …” and re-use the same specification as before. Then repeat as many times as we want to have pods.
This is rather inconvenient, because it is now our job to keep track of all these pods, and to make sure that they are all in sync and use the same specification.
To make things simpler, Kubernetes gives us a higher level construct, the replica set. The specification of a replica set looks very much like the specification of a pod, except that it carries a number, indicating how many replicas — i.e. pods with that particular specification — we want.
So we tell Kubernetes, “I would like a replica set named web, which should have 3 pods, all matching the following specification: ...” and Kubernetes will accordingly make sure that there are exactly 3 matching pods. If we start from scratch, the 3 pods will be created. If we already have 3 pods, nothing is done, because what we have already matches what we want.
# pod-replicas.yml
apiVersion: apps/v1
kind: ReplicaSet
metadata:
  name: web-replicas
  labels:
    app: web
    tier: frontend
spec:
  replicas: 3
  selector:
    matchLabels:
      tier: frontend
  template:
    metadata:
      labels:
        app: web
        tier: frontend
    spec:
      containers:
      - name: nginx
        image: nginx
        ports:
        - containerPort: 80
Replica sets are particularly relevant for scaling and high availability
For scaling, because we can update an existing replica set to change the desired number of replicas. As a consequence, Kubernetes will create or delete pods, so that there ends up being exactly the desired number.
For high availability, because Kubernetes will continuously monitor what’s going on on the cluster, and it will ensure that no matter what happens, we still have the desired number.
If a node goes down, taking one of the web pods with it, Kubernetes creates another pod to replace it. If it turns out that the node wasn’t down, but merely unreachable or unresponsive for a while, when it comes back, we may have one extra pod. Kubernetes will then terminate a pod to make sure that we still have exactly the requested number.
What happens when we change the definition of a pod?
It’s not uncommon to change the definition of a pod. For example, we often want to replace the container image that we are using with a newer version.
Remember: the mission of the replica set is, “make sure that there are N pods matching this specification.” What happens if we change that definition? Suddenly, there are zero pods matching the new specification.
By now we know how a declarative system is supposed to work: Kubernetes should immediately create N pods matching our new specification. The old pods would just stay around until we clean them up manually.
It would be nice if these pods could be removed cleanly and automatically in a CI/CD pipeline; and if the creation of new pods could happen in a more gradual manner.
Sign up to receive a free copy of our upcoming ebook on CI/CD with Kubernetes.
Deployments drive replica sets
This is exactly the role of deployments. At a first glance, the specification for a deployment looks very much like the one for a replica set: it features a pod specification, and a number of replicas. (And a few additional parameters that we will discuss a bit later.)
# deployment-nginx.yml
apiVersion: apps/v1
kind: Deployment
metadata:
  name: web
spec:
  selector:
    matchLabels:
      app: nginx
  replicas: 3
  template:
    metadata:
      labels:
        app: nginx
    spec:
      containers:
      - name: nginx
        image: nginx:1.7.9
        ports:
        - containerPort: 80
Deployments, however, don’t create or delete pods directly. They delegate that work to one ore more replica sets.
When we create a deployment, it creates a replica set, using the exact pod specification that we gave it.
When we update a deployment and adjust the number of replicas, it passes that update down to the replica set.
When the configuration changes
Things get interesting when we need to update the pod specification itself. For instance, we might want to change the image to use (because we’re releasing a new version), or the application’s parameters (through command-line arguments, environment variables, or configuration files).
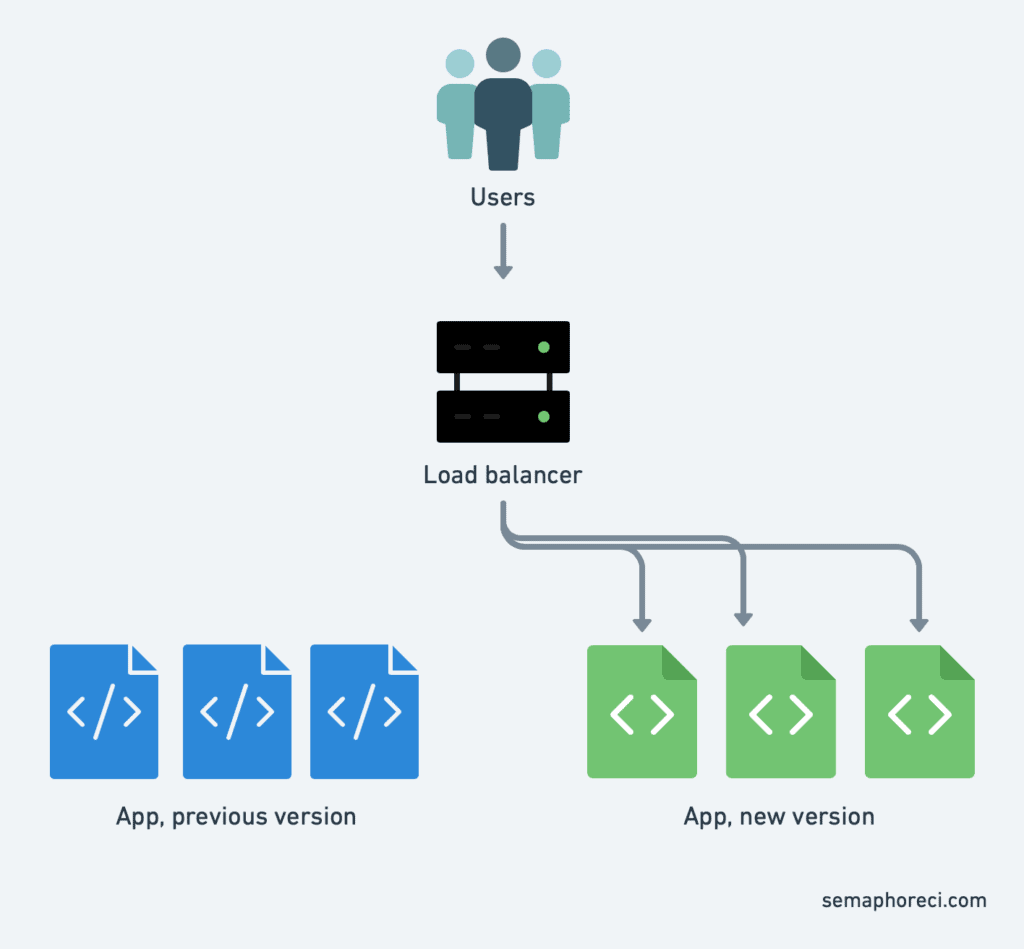
When we update the pod specification, the deployment creates a new replica set with the updated pod specification. That replica set has an initial size of zero. Then, the size of that replica set is progressively increased, while decreasing the size of the other replica set.

We could imagine that we have a sound mixing board in front of us, and we are going to fade in (turn up the volume) on the new replica set, while we fade out (turn down the volume) on the old one.
During the whole process, requests are sent to pods of both the old and new replica sets, without any downtime for our users.
That’s the big picture, but there are many little details that make this process even more robust.
Broken deployments and readiness probes
If we roll out a broken version, it could bring the entire application down (one pod at a time!), as Kubernetes will steadily replace our old pods with the new (broken) version, one at a time.
Unless we use readiness probes.
A readiness probe is a test that we add to a container specification. It’s a binary test, that can only say “IT WORKS” or “IT DOESN’T,” and will get executed at regular intervals. (By default, every 10 seconds.)
Kubernetes supports three ways of implementing readiness probes:
- Running a command inside a container;
- Making an HTTP(S) request against a container; or
- Opening a TCP socket against a container.
Kubernetes uses the result of that test to know if the container and the pod that it’s a part of are ready to receive traffic. When we roll out a new version, Kubernetes will wait for the new pod to mark itself as “ready” before moving on to the next one.
If a pod never reaches the ready state because the readiness probe keeps failing, Kubernetes will never move on to the next. The deployment stops, and our application keeps running with the old version until we address the issue.
If there is no readiness probe, then the container is considered as ready, as long as it could be started. So make sure that you define a readiness probe if you want to leverage that feature!
Rollbacks for quick recovery from bad deploys

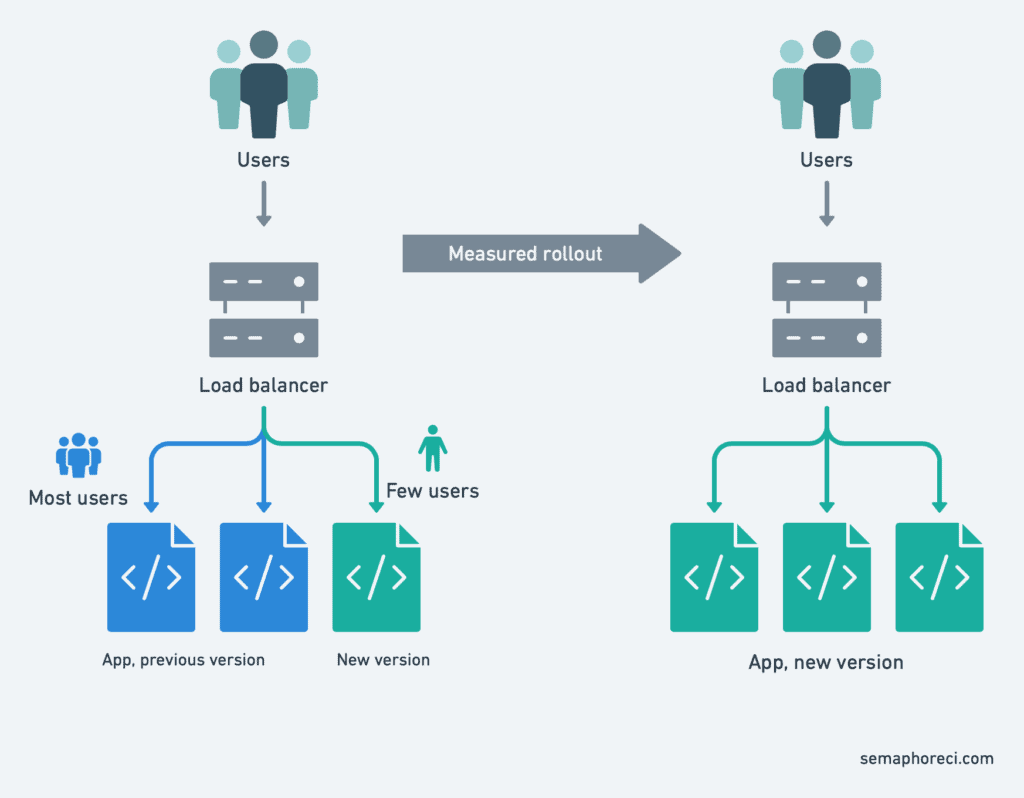
At any point in time, during the rolling update or even later, we can tell Kubernetes: “Hey, I changed my mind; please go back to the previous version of that deployment.” It will immediately switch the roles of the “old” and “new” replica sets. From that point, it will increase the size of the old replica set (up to the nominal size of the deployment), while decreasing the size of the other one.
Generally speaking, this is not limited to two “old” and “new” replica sets. Under the hood, there is one replica set that is considered “up-to-date” and that we can think of as the “target” replica set. That’s the one that we’re trying to move to; that’s the one that Kubernetes will progressively scale up. Simultaneously, there can be any number of other replica sets, corresponding to older versions.
As an example, we might run version 1 of an application over 10 replicas. Then we start rolling out version 2. At some point, we might have 7 pods running version 1, and 3 pods running version 2. We might then decide to release version 3 without waiting for version 2 to be fully deployed (because it fixes an issue that we hadn’t noticed earlier). And while version 3 is being deployed, we might decide, after all, to go back to version 1. Kubernetes will merely adjust the sizes of the replica sets (corresponding to versions 1, 2, and 3 of the application) accordingly.
MaxSurge and MaxUnavailable
Kubernetes doesn’t exactly update our deployment one pod at a time. Earlier, we said that deployments had “a few extra parameters”: these parameters include MaxSurge and MaxUnavailable, and they indicate the pace at which the update should proceed.
We could imagine two strategies when rolling out new versions. We could be very conservative about our application availability, and decide to start new pods before shutting down old ones. Only after a new pod is up, running, and ready, we can terminate an old one.
This implies that we have some spare capacity available on our cluster. However, it might be the case that we can’t afford to run any extra pods, because our cluster is full to the brim, and that we prefer to shutdown an old pod before starting a new one.
MaxSurge indicates how many extra pods we are willing to run during a rolling update, while MaxUnavailable indicates how many pods we can lose during the rolling update. Both parameters are specific to a deployment (in other words, each deployment can have different values for them). Both parameters can be expressed as an absolute number of pods, or as a percentage of the deployment size; and both parameters can be zero (but not at the same time).
Let’s see a few typical values for MaxSurge and MaxUnavailable, and what they mean.
Setting MaxUnavailable to 0 means, “do not shutdown any old pod before a new one is up and ready to serve traffic“.
Setting MaxSurge to 100% means, “immediately start all the new pods“, implying that we have enough spare capacity on our cluster, and that we want to go as fast as possible.
The default values for both parameters are 25%, meaning that when updating a deployment of size 100, 25 new pods are immediately created, while 25 old pods are shutdown. Each time a new pod comes up (and is marked ready), another old pod can be shutdown. Each time an old pod has completed its shutdown (and its resources have been freed), another new pod can be created.
Demo time!
It’s easy to see these parameters in action. We don’t need to write custom YAML, define readiness probes, or anything like that.
All we have to do is to tell a deployment to use an invalid image; for instance an image that doesn’t exist. The containers will never be able to come up, and Kubernetes will never mark them as “ready.”
If you have a Kubernetes cluster (a one-node cluster like minikube or Docker Desktop is fine), you can run the following commands in different terminals to watch what is going to happen:
kubectl get pods -wkubectl get replicasets -wkubectl get deployments -wkubectl get events -w
Then, create, scale, and update a deployment with the following commands:
kubectl run deployment web --image=nginx
kubectl scale deployment web --replicas=10
kubectl set image deployment web nginx=that-image-does-not-exist
We see that the deployment is stuck, but 80% of the application’s capacity is still available.
If we run kubectl rollout undo deployment web, Kubernetes will go back to the initial version (running the nginximage).
Understanding selectors and labels
It turns out that when we said earlier, “the job of a replica set is to make sure that there are exactly N pods matching the right specification“, that’s not exactly what’s going on. Actually, the replica set doesn’t look at the pods’ specifications, but only at their labels.
In other words, it doesn’t matter if the pods are running nginx or redis or whatever; all that matters is that they have the right labels. (In our examples above, labels would look like run=web and pod-template-hash=xxxyyyzzz.)
A replica set contains a selector, which is a logical expression that “selects” (just like a SELECT query in SQL) a number of pods. A replica set makes sure that there is the right number of pods, creating or deleting pods if necessary; but it doesn’t change existing pods.
Just in case you’re wondering: yes, it is absolutely possible to manually create pods with these labels, but running a different image (or with different settings), and fool our replica set.
At first, this could sound like a big potential problem. In practice, though, it is very unlikely that we would accidentally pick the “right” (or “wrong”, depending on the perspective) labels, because they involve a hash function on the pod’s specification that is all but random.
Services as load balancers
Selectors are also used by services, which act as the load balancers for Kubernetes traffic, internal and external. We can create a service for the web deployment with the following command:
kubectl expose deployment web --port=80The service will have its own internal IP address (denoted by the name ClusterIP), and connections to this IP address on port 80 will be load-balanced across all the pods of this deployment.
In fact, these connections will be load-balanced across all the pods matching the service’s selector. In that case, that selector will be run=web.
When we edit the deployment and trigger a rolling update, a new replica set is created. This replica set will create pods, whose labels will include (among others) run=web. As such, these pods will receive connections automatically.
This means that during a rollout, the deployment doesn’t reconfigure or inform the load balancer that pods are started and stopped. It happens automatically through the selector of the service associated to the load balancer.
(If you’re wondering how probes and healthchecks play into this: a pod is added as a valid endpoint for a service only if all its containers pass their readiness check. In other words, a pod starts receiving traffic only once it’s actually ready for it.)
Advanced Kubernetes deployment strategies
Sometimes, we want even more control when we roll out a new version.
Two popular techniques which you might have heard about are blue/green deployment and canary deployment.
Blue / green deployment with Kubernetes
In blue/green deployment, we want to instantly switch over all the traffic from the old version to the new, instead of doing it progressively like explained previously. There could be a few reasons for us to do that, including:
- We don’t want a mix of old and new requests, and we want the break from one version to the next to be as clean as possible;
- We are updating multiple components (say, web frontend and API backend) together, and we don’t want the new version of the web frontend to talk to the old version of the API backend or vice versa;
- If something goes wrong, we want the ability to revert as fast as possible, without even waiting for the old set of containers to restart.
We can achieve blue/green deployment by creating multiple deployments (in the Kubernetes sense), and then switching from one to another by changing the selector of our service.
This is easier than it sounds!
The following commands will create two deployments blue and green, respectively using the nginx and httpdcontainer images:
kubectl create deployment blue --image=nginx
kubectl create deployment green --image=httpd
Then, we create a service called web, which initially won’t send traffic anywhere:
kubectl create service clusterip web --tcp=80Now, we can update the selector of service web by running kubectl edit service web. This will retrieve the definition of service web from the Kubernetes API, and open it in a text editor. Look for the section that says:
selector:
  app: web
… and replace web with blue or green, to your liking. Save and exit. kubectl will push our updated definition back to the Kubernetes API, and voilà! Service web is now sending traffic to the corresponding deployment.
(You can verify for yourself by retrieving the IP address of that service with kubectl get svc web and connecting to that IP address with curl.)
The modification that we did with a text editor can also be done entirely from the command line, using (for instance)kubectl patch as follows:
kubectl patch service web -p '{"spec": {"selector": {"app": "green"}}}'The advantage of blue/green deployment is that the traffic switch is almost instantaneous, and we can roll back to the previous version just as fast, by updating the service definition again.
Canary deployment with Kubernetes
Canary deployment alludes to the canaries that were used in coal mines, to detect dangerous concentrations of toxic gas like carbon monoxide. The miners would carry a canary in a cage. Canaries are more sensitive to toxic gas than humans. If the canary passed out, it meant that the miners had reached a dangerous area and should head back before they would pass out too.
How does that map to software deployment?
Sometimes, we can’t or won’t afford to affect all our users with a flawed version, even for a brief period of time. So instead, we do a partial rollout of the new version. For instance, we deploy a couple of replicas running the new version; or we send 1% of our users to that new version.
Then, we compare metrics between the current version and the canary that we just deployed. If the metrics are similar, we can proceed. If latency, error rates, or anything else looks wrong, we roll back.
This technique, which would be fairly involved to set up, ends up being relatively straightforward thanks to Kubernetes’ native mechanisms of labels and selectors.
It’s worth noting that in the previous example, we changed the service’s selector, but it is also possible to change the pods’ labels.
For instance, is a service’s selector is set to look for pods with the label status=enabled, we can apply such a label to a specific pod with:
kubectl label pod fronted-aabbccdd-xyz status=enabledWe can apply labels en masse as well, for instance:
kubectl label pods -l app=blue,version=v1.5 status=enabledAnd we can remove them just as easily:
kubectl label pods -l app=blue,version=v1.4 status-Conclusions
We saw a few techniques that can be used to deploy with more confidence. Some of these techniques simply reduce the downtime caused by the deployment itself, meaning that we can deploy more often, without being afraid of affecting our users.
Some of these techniques give us a safety belt, preventing a bad version from taking down our service. And some others give us an extra peace of mind, like hitting the “SAVE” button in a video game before trying a particularly difficult sequence, knowing that if something goes wrong, we can always go back where we were.
Kubernetes makes it possible for developers and operation teams to leverage these techniques, which leads to safer deployments. If the risk associated with deployments is lower, it means that we can deploy more often, incrementally, and see more easily the results of our changes as we implement them; instead of deploying once a week or month, for instance.
The end result is a higher development velocity, lower time-to-market for fixes and new features, as well as better availability of our applications. Which was the whole point of implementing containers and continuous delivery in the first place.
How to apply what you’ve learned
Hopefully, this post has equipped you with enough knowledge to run your first real deploy to Kubernetes.
The following tutorials on CI/CD with Kubernetes can help you with implementation:
- Setting up Continuous Integration and Delivery to AWS EKS
- CI/CD for Microservices on DigitalOcean Kubernetes
Photo credits: frank mckenna, Anthony Roberts and Jim Wilson.
Greate article; really helped me to get a helicopter view of kubernetes. One small thing: the first command in the “Demo Time!” section should be ‘kubectl create deployment web –image=nginx’ instead of ‘kubectl run deployment web –image=nginx’.