Kubernetes has become the de facto standard for managing containerized applications, with many enterprises adopting it in their production environments. In this blog, we describe the kind of performance you can achieve with NGINX Ingress Controller for Kubernetes, detailing the results of our performance testing of three metrics: requests per second, SSL/TLS transactions per second, and throughput. We also include the full NGINX and Kubernetes configurations we used.
You can use our performance numbers and configuration to help you determine the right topology, specs, and Kubernetes configuration for delivering your own apps at the level of performance and scale you require.
Topology
For all tests, the wrk utility running on a client machine generated traffic and sent it over a 40‑Gigabit Ethernet link to a Kubernetes cluster of two nodes (one primary and one secondary), which were connected by a 10‑Gigabit link.
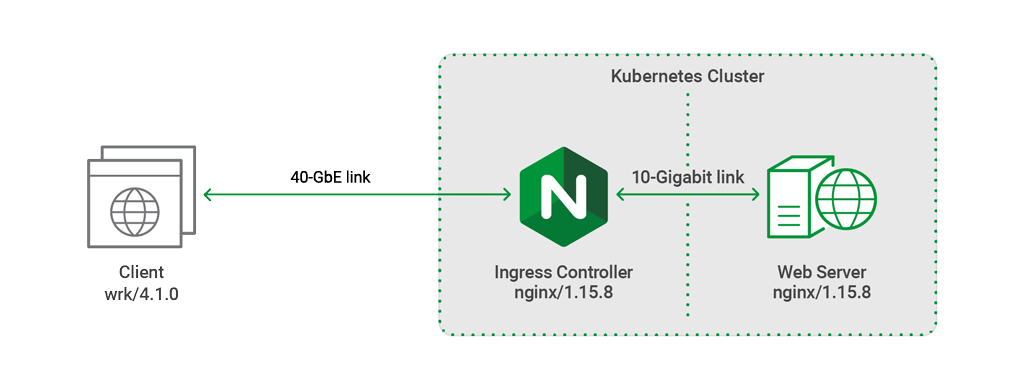
NGINX Ingress Controller was deployed as a Kubernetes Pod on the primary node to perform SSL termination and Layer 7 routing. The upstream Pod running on the secondary node was an NGINX web server serving static content of various sizes.
Hardware Used
The following hardware was used for the testing.
| Machine | CPU | Network | Memory |
|---|---|---|---|
| Client | 2x Intel(R) Xeon(R) CPU E5‑2699 v4 @ 2.20GHz, 44 real (or 88 HT) cores | 1x Intel XL710 40GbE QSFP+ | 128 GB |
| Primary Node | 2x Intel(R) Xeon(R) Platinum 8168 CPU @ 2.70GHz, 48 real (or 96 HT) cores | 1x Intel XL710 40GbE QSFP+ | 192 GB |
| Secondary Node | 2x Intel(R) Xeon(R) CPU E5‑2699 v4 @ 2.20GHz, 44 real (or 88 HT) cores | 1x Intel 10‑Gigabit X540‑AT2 | 128 GB |
Software Used
We used the following software for testing:
wrkversion 4.1.0, installed according to these instructions- NGINX Ingress Controller version 1.4.3 (including the latest GitHub commits available at the time of testing), pulled from Docker Hub
- NGINX Open Source version 1.15.8
- Kubernetes version 1.13.1
- Ubuntu 18.04.1 LTS (all three machines)
- OpenSSL version 1.1.0g
- Flannel as the networking overlay stack
Metrics Collected
We ran tests to collect three performance metrics:
- Requests per second (RPS) – The number of requests NGINX Ingress Controller can process per second, averaged over a fixed time period. The client initiated each request and directed it to NGINX Ingress Controller. NGINX Ingress Controller proxied the request to the upstream Pod to fetch the static content requested by the client. The static content was a 1‑KB file, which is roughly the size of a small CSS or JavaScript file, or a very small image.
- SSL/TLS transactions per second (TPS) – The number of new HTTPS connections NGINX Ingress Controller can establish and serve per second, averaged over a fixed time period. Clients sent a series of HTTPS requests, each on a new connection. The client and NGINX Ingress Controller performed a TLS handshake to establish a secure connection, then NGINX Ingress Controller parsed the request and sent back a 0‑KB response. The connection closed after the request was fully satisfied.
- Throughput – The data transmission rate that NGINX is able to sustain while processing HTTP requests for static content over a fixed time period. The static content was a 1‑MB file, because requests for larger files increase the overall throughput of the system.
Testing Methodology
We generated client traffic using the following wrk options:
- The
-coption specifies the number of TCP connections to create. For our testing, we set this to 1000 connections. - The
-doption specifies how long to generate traffic. We ran our tests for 180 seconds (3 minutes) each. - The
-toption specifies the number of threads to create. We specified 44 threads.
To fully exercise each CPU we used taskset, which can pin a single wrk process to a CPU. This method yields more consistent results than increasing the number of wrk threads.
When testing HTTPS performance, we used RSA with a 2048‑bit key size and Perfect Forward Secrecy; the SSL cipher was ECDHE-RSA-AES256-GCM-SHA384.
Testing RPS
To measure RPS, we ran the following script on the client machine:
taskset -c 0-21,44-65 wrk -t 44 -c 1000 -d 180s https://host.example.com:443/1kb.binThis script spawns one wrk thread on each of 44 CPUs. Each thread creates 1000 TCP connections and for 3 minutes continuously requests a 1‑KB file over each connection.
Testing TPS
To measure TPS, we ran the following script:
taskset -c 0-21,44-65 wrk -t 44 -c 1000 -d 180s -H ‘Connection: Close’ https://host.example.com:443This test uses the same wrk options as the RPS test, but differs in two notable ways because the focus is on processing of SSL/TLS connections:
- The client opens and closes a connection for each request (the
-Hoption sets the HTTPConnection:closeheader). - The requested file is 0 KB in size instead of 1 KB.
Testing HTTP Throughput
To measure throughput, we ran the following script:
taskset -c 0-21,44-65 wrk -t 44 -c 1000 -d 180s https://host.example.com:443/1mb.binThis test uses the wrk options as the RPS test, except that the requested file is 1 MB in size instead of 1 KB.
Performance Analysis
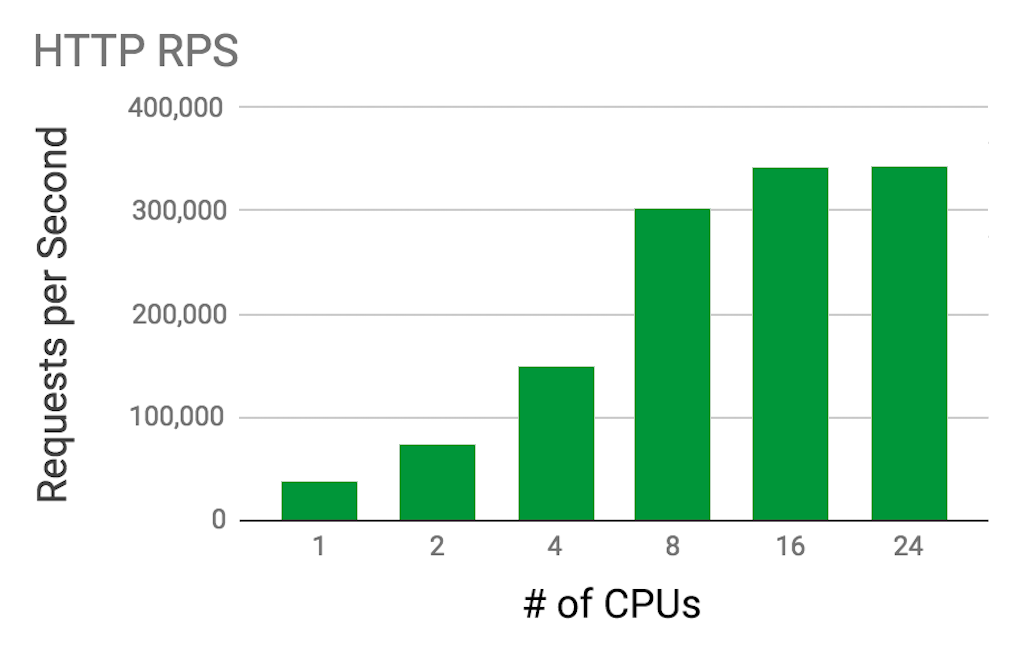
RPS for HTTP Requests
The table and graph show the number of HTTP requests for a 1‑KB file that NGINX Ingress Controller processed per second on different numbers of CPUs.
Performance increases in roughly direct proportion with the number of CPUs, up to 16 CPUs. We consistently found that there is little to no benefit in performance with 24 CPUs compared to 16. This is because resource contention eventually outweighs the increased performance expected from a higher number of CPUs.
| CPUs | RPS |
|---|---|
| 1 | 36,647 |
| 2 | 74,192 |
| 4 | 148,936 |
| 8 | 300,625 |
| 16 | 342,651 |
| 24 | 342,785 |
RPS for HTTPS Requests
The encryption and decryption required for HTTPS requests increases computing expenditure compared to unencrypted HTTP requests.
For the tests with up to 8 CPUs, results are as expected: RPS is lower for HTTPS compared to HTTP, by about 20%.
For the tests with 16 or 24 CPUs, there is essentially no difference between HTTPS and HTTP, again because of resource contention.
| CPUs | RPS |
|---|---|
| 1 | 28,640 |
| 2 | 58,041 |
| 4 | 117,255 |
| 8 | 236,703 |
| 16 | 341,232 |
| 24 | 342,785 |

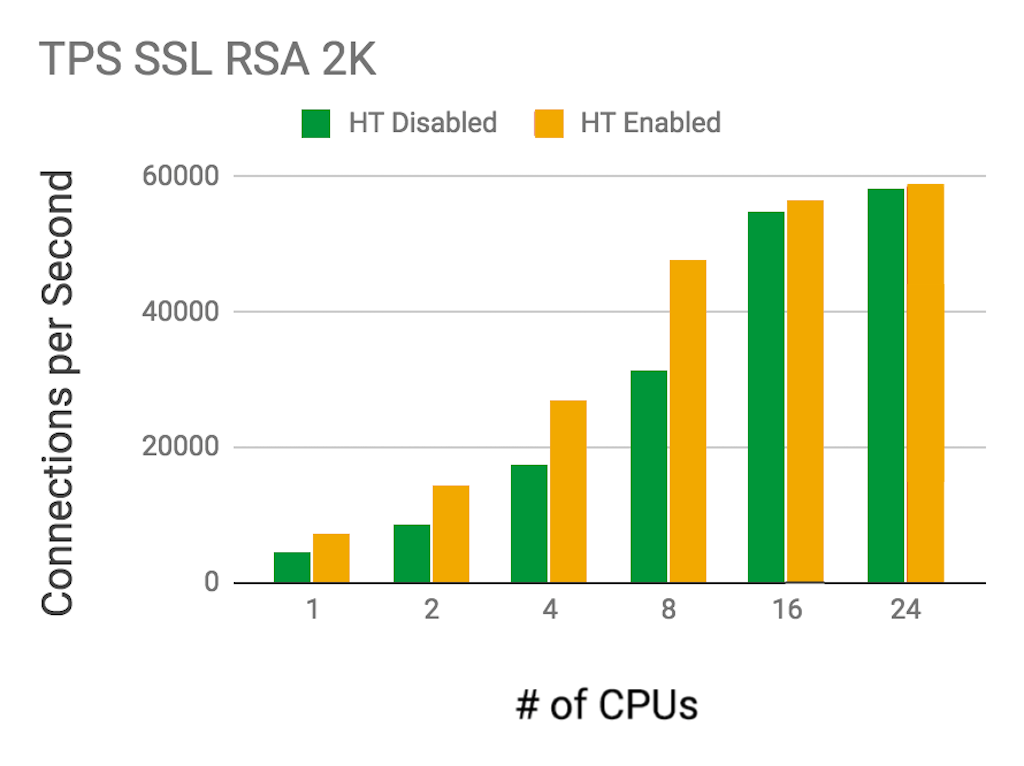
TPS
The table and graph depict NGINX Ingress Controller’s performance for TPS on varying numbers of CPUs, with and without Intel® Hyper‑Threading Technology (HT).
Because TLS handshakes are CPU bound and encryption tasks are parallelizable, HT can significantly increase performance for this metric. We found it improved performance by 50–65% up to 16 CPUs.
| CPUs | SSL TPS (HT Disabled) | SSL TPS (HT Enabled) |
|---|---|---|
| 1 | 4,433 | 7,325 |
| 2 | 8,707 | 14,254 |
| 4 | 17,433 | 26,950 |
| 8 | 31,485 | 47,638 |
| 16 | 54,877 | 56,715 |
| 24 | 58,126 | 58,811 |
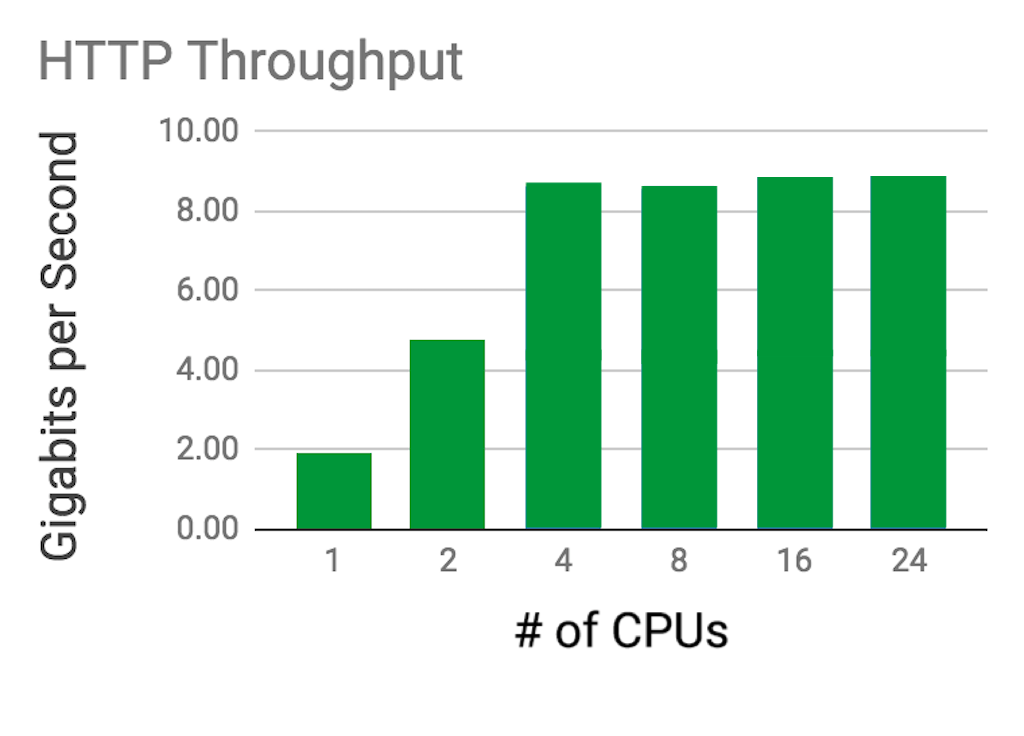
Throughput
The table and graph show the throughput of HTTP requests (in Gbps) that NGINX is able to sustain over a period of 3 minutes, on different numbers of CPUs.
Throughput is proportional to the size of requests issued by the client. Performance peaked at just under 10 Gbps, as expected: the secondary node of the Kubernetes cluster is equipped with an Intel 10‑Gigabit X540‑AT2 Network Interface Card.
| CPUs | Throughput (Gbps) |
|---|---|
| 1 | 1.91 |
| 2 | 4.78 |
| 4 | 8.72 |
| 8 | 8.64 |
| 16 | 8.80 |
| 24 | 8.80 |
Technical Details of Testing
Kubernetes Configuration for Deployment of NGINX Ingress Controller
We deployed NGINX Ingress Controller with the following Kubernetes configuration file. It defines a Kubernetes DaemonSet running one copy of a Pod dedicated to the nginx/nginx-ingress:edge container image from our DockerHub repository. We assign the Pod to the primary node by specifying the primary node’s label (npq3) in the nodeSelector field.
To list the labels attached to your cluster nodes, run the following command:
$ kubectl get nodes --show-labelsThe container image is exposed on port 80 and 443 for incoming and outgoing HTTP and HTTPS connections, respectively. We include two arguments in the args field:
- The
-nginx-configmapsargument enables us to apply configuration changes to the NGINX Ingress Controller Pod using ConfigMaps. - The
-default-server-tls-secretsets the default Secret used for TLS requests reaching the NGINX Ingress Controller entry point that do not match a TLS path‑based rule specified in the Ingress resource.
apiVersion: extensions/v1beta1
kind: DaemonSet
metadata:
  name: nginx-ingress
  namespace: nginx-ingress
spec:
  selector:
    matchLabels:
      app: nginx-ingress
  template:
    metadata:
      labels:
        app: nginx-ingress
    spec:
      serviceAccountName: nginx-ingress
      nodeSelector:
        kubernetes.io/hostname: npq3
      hostNetwork: true
      containers:
      - image: nginx/nginx-ingress:edge
        imagePullPolicy: IfNotPresent
        name: nginx-ingress
        ports:
        - name: http
          containerPort: 80
          hostPort: 80
        - name: https
          containerPort: 443
          hostPort: 443
        env:
        - name: POD_NAMESPACE
          valueFrom:
            fieldRef:
              fieldPath: metadata.namespace
        - name: POD_NAME
          valueFrom:
            fieldRef:
              fieldPath: metadata.name
        args:
          - -nginx-configmaps=$(POD_NAMESPACE)/nginx-config
          - -default-server-tls-secret=$(POD_NAMESPACE)/default-server-secret
Kubernetes Service Configuration for Exposing NGINX Ingress Controller
The configuration below creates a Kubernetes Service to expose the NGINX Ingress Controller Pod to a host IP address at static ports (80 and 443). In the testing environment, we expose the NGINX Ingress Controller Pod to the client machine by assigning it an external IP address (10.10.16.10) in the externalIPs field. The address must be the one assigned to the 40GbE network interface on the primary node.
apiVersion: v1
kind: Service
metadata:
  name: nginx-ingress
  namespace: nginx-ingress
spec:
  externalTrafficPolicy: Local
  ports:
  - port: 80
    targetPort: 80
    protocol: TCP
    name: http
  - port: 443
    targetPort: 443
    protocol: TCP
    name: https
  externalIPs:
  - 10.10.16.10
  selector:
    app: nginx-ingress
Kubernetes ConfigMap for NGINX Ingress Controller
ConfigMaps give you more granular control over NGINX configurations, allowing you to use advanced NGINX features and customize NGINX behavior. You can set NGINX directives by assigning values to a list of available ConfigMap keys under the data entry.
Some NGINX modules and parameters cannot be set directly through general ConfigMaps and Annotations. However, using the main-template ConfigMap key, you can load custom NGINX configuration templates, giving you full control over the NGINX configuration in a Kubernetes environment.
For example, in this configuration we modify the main nginx template and set the following directives to further increase performance:
tcp_nodelayandtcp_nopushtoonaccess_logtooffkeepalive_timeoutto315s(315 seconds) andkeepalive_requeststo1000000(a million), when testing for RPS
We then paste the modified template into the value of the main-template ConfigMap key as shown below. We’ve abridged the configuration in the http{} context to highlight the most relevant directives, and the modified ones appear in orange.
kind: ConfigMap
apiVersion: v1
metadata:
  name: nginx-config
  namespace: nginx-ingress
data:
  worker-processes: "24"
  worker-connections: "100000"
  worker-rlimit-nofile: "102400"
  worker-cpu-affinity: "auto 111111111111111111111111"
  keepalive: "200"
  main-template: |
   user nginx;
   worker_processes  {{.WorkerProcesses}};
   {{- if .WorkerRlimitNofile}}
   worker_rlimit_nofile {{.WorkerRlimitNofile}};{{end}}
   {{- if .WorkerCPUAffinity}}
   worker_cpu_affinity {{.WorkerCPUAffinity}};{{end}}
   {{- if .WorkerShutdownTimeout}}
   worker_shutdown_timeout {{.WorkerShutdownTimeout}};{{end}}
   daemon off;

   error_log  /var/log/nginx/error.log {{.ErrorLogLevel}};
   pid        /var/run/nginx.pid;

   {{- if .MainSnippets}}
   {{range $value := .MainSnippets}}
   {{$value}}{{end}}
   {{- end}}

   events {
       worker_connections  {{.WorkerConnections}};
   }

   http {
       include       /etc/nginx/mime.types;
       default_type  application/octet-stream;

       ...


       sendfile        on;
       access_log  off;
       tcp_nopush  on;
       tcp_nodelay on;

       keepalive_timeout  315;
       keepalive_requests 10000000;

       #gzip  on;
        ...
   }
Note: At the time of testing, we had to use the template to set the access_log, keepalive_timeout, and keepalive_requests directives. In a subsequent commit of NGINX Ingress Controller, additional ConfigMap keys were added so that you don’t need to use templates to configure those directives. You can also use the http-snippets key to configure other directives (such as tcp_nodelay and tcp_nopush) as an alternative to dealing with templates.
Kubernetes DaemonSet for the Backend
This section describes the performance optimizations we made to the network between the NGINX Ingress Controller and upstream Pods in our testing. The optimizations involve the Flannel networking stack and the DaemonSet for the web server upstream.
Networking Optimization
Flannel is a tool for configuring a Layer 3 network fabric in a Kubernetes environment. We recommend using Flannel’s VXLAN backend option when nodes in your cluster are not in the same subnet and not reachable with Layer 2 connectivity. When cross‑host container communication needs to happen on different subnets, the flannel device on each node is a VXLAN device that encapsulates TCP packets into UDP packets and sends them to the remote VXLAN device. However, the VXLAN backend option is not optimal for performance, because every request needs to go through the flannel device to arrive at the correct Pod destination.
The cluster nodes in our testing environment were on the same subnet and had Layer 2 connectivity. Therefore, we didn’t need a VXLAN device for cross-host container communication. We were able to create direct kernel IP routes to remote machine IP addresses within the same LAN.
Thus each time NGINX Ingress Controller proxied connections to the web server Pod, we forwarded the packets to the destination host and bypassed the flannel device, instead of the flannel daemon (flanneld) encapsulating UDP packets to remote hosts. This increased performance and reduced the number of dependencies. The easiest way to set this option is to change the backend option in the Flannel ConfigMap to "Type": "host-gw" before deploying the Flannel network. Alternatively, you can manually change the kernel route tables.
Backend DaemonSet Deployment
The NGINX configuration used for the backend Pod is defined by the app-conf and main-conf ConfigMaps. The binary ConfigMap creates the 1‑KB file returned to clients in the RPS tests.
apiVersion: v1
data:
  app.conf: "server {\n listen 80;\nlocation / {\n root /usr/share/nginx/bin;
    \n  }\n}\n"
kind: ConfigMap
metadata:
  name: app-conf
  namespace: default

---

apiVersion: v1
data:
  nginx.conf: |+
    user  nginx;
    worker_processes  44;
    worker_rlimit_nofile 102400;
    worker_cpu_affinity auto 0000000000000000000000111111111111111111111100000000000000000000001111111111111111111111;

    error_log  /var/log/nginx/error.log notice;
    pid        /var/run/nginx.pid;

    events {
        worker_connections  100000;
    }

    http {

        log_format  main  '$remote_addr - $remote_user [$time_local] "$request" '
                          '$status $body_bytes_sent "$http_referer" '
                          '"$http_user_agent" "$http_x_forwarded_for"';

        sendfile        on;
        tcp_nopush     on;
        tcp_nodelay on;

        access_log off;

        include /etc/nginx/conf.d/*.conf;
    }

---

apiVersion: v1
data:
  1kb.bin: "\0\0\0\0\0\0\0\0\0\0\0\0\0\0\0\0\0\0\0\0\0\0\0\0\0\0\0\0\0\0\0\0\0\0\0\0\0\0\0\0\0\0\0\0\0\0\0\0\0\0\0\0\0\0\0\0\0\0\0\0\0\0\0\0\0\0\0\0\0\0\0\0\0\0\0\0\0\0\0\0\0\0\0\0\0\0\0\0\0\0\0\0\0\0\0\0\0\0\0\0\0\0\0\0\0\0\0\0\0\0\0\0\0\0\0\0\0\0\0\0\0\0\0\0\0\0\0\0\0\0\0\0\0\0\0\0\0\0\0\0\0\0\0\0\0\0\0\0\0\0\0\0\0\0\0\0\0\0\0\0\0\0\0\0\0\0\0\0\0\0\0\0\0\0\0\0\0\0\0\0\0\0\0\0\0\0\0\0\0\0\0\0\0\0\0\0\0\0\0\0\0\0\0\0\0\0\0\0\0\0\0\0\0\0\0\0\0\0\0\0\0\0\0\0\0\0\0\0\0\0\0\0\0\0\0\0\0\0\0\0\0\0\0\0\0\0\0\0\0\0\0\0\0\0\0\0\0\0\0\0\0\0\0\0\0\0\0\0\0\0\0\0\0\0\0\0\0\0\0\0\0\0\0\0\0\0\0\0\0\0\0\0\0\0\0\0\0\0\0\0\0\0\0\0\0\0\0\0\0\0\0\0\0\0\0\0\0\0\0\0\0\0\0\0\0\0\0\0\0\0\0\0\0\0\0\0\0\0\0\0\0\0\0\0\0\0\0\0\0\0\0\0\0\0\0\0\0\0\0\0\0\0\0\0\0\0\0\0\0\0\0\0\0\0\0\0\0\0\0\0\0\0\0\0\0\0\0\0\0\0\0\0\0\0\0\0\0\0\0\0\0\0\0\0\0\0\0\0\0\0\0\0\0\0\0\0\0\0\0\0\0\0\0\0\0\0\0\0\0\0\0\0\0\0\0\0\0\0\0\0\0\0\0\0\0\0\0\0\0\0\0\0\0\0\0\0\0\0\0\0\0\0\0\0\0\0\0\0\0\0\0\0\0\0\0\0\0\0\0\0\0\0\0\0\0\0\0\0\0\0\0\0\0\0\0\0\0\0\0\0\0\0\0\0\0\0\0\0\0\0\0\0\0\0\0\0\0\0\0\0\0\0\0\0\0\0\0\0\0\0\0\0\0\0\0\0\0\0\0\0\0\0\0\0\0\0\0\0\0\0\0\0\0\0\0\0\0\0\0\0\0\0\0\0\0\0\0\0\0\0\0\0\0\0\0\0\0\0\0\0\0\0\0\0\0\0\0\0\0\0\0\0\0\0\0\0\0\0\0\0\0\0\0\0\0\0\0\0\0\0\0\0\0\0\0\0\0\0\0\0\0\0\0\0\0\0\0\0\0\0\0\0\0\0\0\0\0\0\0\0\0\0\0\0\0\0\0\0\0\0\0\0\0\0\0\0\0\0\0\0\0\0\0\0\0\0\0\0\0\0\0\0\0\0\0\0\0\0\0\0\0\0\0\0\0\0\0\0\0\0\0\0\0\0\0\0\0\0\0\0\0\0\0\0\0\0\0\0\0\0\0\0\0\0\0\0\0\0\0\0\0\0\0\0\0\0\0\0\0\0\0\0\0\0\0\0\0\0\0\0\0\0\0\0\0\0\0\0\0\0\0\0\0\0\0\0\0\0\0\0\0\0\0\0\0\0\0\0\0\0\0\0\0\0\0\0\0\0\0\0\0\0\0\0\0\0\0\0\0\0\0\0\0\0\0\0\0\0\0\0\0\0\0\0\0\0\0\0\0\0\0\0\0\0\0\0\0\0\0\0\0\0\0\0\0\0\0\0\0\0\0\0\0\0\0\0\0\0\0\0\0\0\0\0\0\0\0\0\0\0\0\0\0\0\0\0\0\0\0\0\0\0\0\0\0\0\0\0\0\0\0\0\0\0\0\0\0\0\0\0\0\0\0\0\0\0\0\0\0\0\0\0\0\0\0\0\0\0\0\0\0\0\0\0\0\0\0\0\0\0\0\0\0\0\0\0\0\0\0\0\0\0\0\0\0\0\0\0\0\0\0\0\0\0\0\0\0\0\0\0\0\0\0\0\0\0\0\0\0\0\0\0\0\0\0\0\0\0\0\0\0\0\0\0\0\0\0\0\0\0\0\0\0\0\0\0\0\0\0\0\0\0\0\0\0\0\0\0\0\0\0\0\0\0\0\0\0\0\0\0"
kind: ConfigMap
metadata:
  name: binary
  namespace: default
Now we create a Kubernetes DaemonSet consisting of one NGINX backend Pod dedicated to the secondary node (web-server-payload) that returns a static file. The ConfigMaps (app-conf, main-conf, and binary) are mounted on the nginx image as volumes. We assign the Pod to the secondary node by specifying the secondary node’s label (nbdw34) in the nodeSelector field. Make sure the label you specify is attached to the secondary node.
apiVersion: extensions/v1beta1
kind: DaemonSet
metadata:
  name: web-server-payload
spec:
  selector:
    matchLabels:
      app: web-server-payload
  template:
    metadata:
      labels:
        app: web-server-payload
    spec:
      hostNetwork: true
      containers:
      - name: web-server-payload
        image: nginx
        ports:
        - containerPort: 80
        volumeMounts:
        - name: app-config-volume
          mountPath: /etc/nginx/conf.d
        - name: main-config-volume
          mountPath: /etc/nginx
        - name: binary-payload
          mountPath: /usr/share/nginx/bin
      volumes:
      - name: app-config-volume
        configMap:
          name: app-conf
      - name: main-config-volume
        configMap:
          name: main-conf
      - name: binary-payload
        configMap:
          name: binary
      nodeSelector:
        kubernetes.io/hostname: nbdw34
To further maximize networking performance, we set the web-server-payload Pod to the host network namespace by setting the hostNetwork field to true. This directly exposes the web-server-payload Pod to the host (secondary node) network driver at port 80, instead of exposing it in the container networking namespace (cni0), which is the default behavior. You can expect an average 10–15% increase in RPS from setting hostNetwork to true.
Finally, we create the web-server-svc service to expose the web-server-payload Pod to NGINX Ingress Controller.
apiVersion: v1
kind: Service
metadata:
  name: web-server-svc
spec:
  ports:
  - port: 80
    targetPort: 80
    protocol: TCP
    name: http
  selector:
    app: web-server-payload
Kubernetes Ingress Resource
The Ingress resource allows you to set basic NGINX features such as SSL termination and Layer 7 path‑based routing. We use a Kubernetes Secret for SSL termination and set a rule stating that all request URIs with the host.example.com host header are proxied to the web-server-svc service through port 80.
apiVersion: extensions/v1beta1
kind: Ingress
metadata:
  name: example-ingress
spec:
  tls:
  - hosts:
    - host.example.com
    secretName: example-secret
  rules:
  - host: host.example.com
    http:
      paths:
      - path: /
        backend:
          serviceName: web-server-svc
          servicePort: 80
Conclusion
We have provided the configuration and deployment details used for producing optimal performance test results with NGINX Ingress Controller in a Kubernetes environment. Our results for RPS converged to a maximum of roughly 340K as we scaled past 16 CPUs. A machine with only 16 CPUs might deliver the same RPS as one with 24 CPUs. Use this information to provision an affordable solution that satisfies your performance and scaling requirements when deploying your production workload in Kubernetes.
Test the performance of NGINX Ingress Controller with NGINX Plus and NGINX App Protect for yourself –
get started today!
To try NGINX Ingress Controller with NGINX Open Source, you can obtain the source code, or download a prebuilt container from DockerHub.