How Kubernetes Deployments Work

We’ve written quite a few blog posts about the Kubernetes container orchestration engine and how to deploy to Kubernetes already, but none cover how Kubernetes Deployments work in detail.
With Kubernetes Deployments, you “describe a desired state in a Deployment object, and the Deployment controller changes the actual state to the desired state at a controlled rate,” the Kubernetes Deployment documentation states. In this blog, we’ll explain both how Deployments work from a high-level perspective, and then get our hands dirty by creating a Deployment and seeing how it relates to ReplicaSet and Pod objects.
Objects in Kubernetes
Before we take a look at how Deployments work exactly, let’s take a step back. Kubernetes is actually an object store, plus code that interacts with those objects. Each object that you store has three parts: the metadata, a specification and the current observed status.
As a user, you have to provide the metadata, and a specification in which you describe the desired state of the object. Kubernetes tries very hard to make this desired state happen, reports on its progress under the status key of the object.
High-Level View of Deployments
Kubernetes deployments manage stateless services running on your cluster (as opposed to for example StatefulSets which do manage stateful services). Their purpose is to keep a set of identical pods running and upgrade them in a controlled way – performing a rolling update by default. For more details about different deployment strategies possible with deployments, see the blogpost by my colleague Etienne.
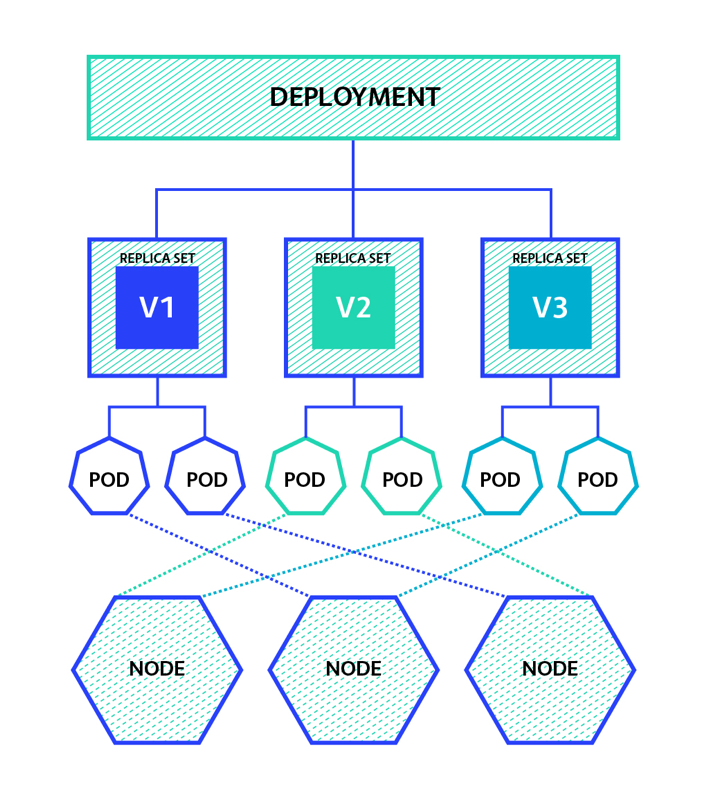
A Kubernetes Deployment managed ReplicaSet. Each one represents a different version of the deployed application. Each ReplicaSet manages a set of identically versioned Pods.
Creating a Deployment Object

Be sure to have a Kubernetes cluster running before you continue. I recommend using minikube, or creating a small cluster using Google Container Engine.
Is your cluster ready? Great! Then create a Deployment object by running the following command:
|
1 2 3 |
$ kubectl run my-nginx --image=nginx --port 80 deployment "my-nginx" created |
You can of course also create a .yml manifest and use kubectl create or kubectl apply to create the deployment.
Now we’ll see what has been created in Kubernetes. Given that the output is quite long, I’ve removed some values that are not relevant for now and split it into pieces to explain each part separately.
TIP: By using kubectl get $OBJECT_KIND $NAME -o $FORMAT (with $FORMAT=yaml or $FORMAT=json), you will be able to see more details than the output of a plain kubectl get.
|
1 2 3 4 5 6 7 8 9 10 11 12 13 14 15 |
$ kubectl get deployment my-nginx -o yaml apiVersion: extensions/v1beta1 kind: Deployment metadata: <strong>annotations:</strong> <strong> deployment.kubernetes.io/revision: "1"</strong> <strong> name: my-nginx</strong> <strong> uid: 2c2a591a-c869-11e7-b488-42010a8401a1</strong> <strong> labels:</strong> <strong> run: my-nginx</strong> ... spec: ... (covered later) status: ... (covered later) |
The metadata contains the name of the deployment (which must be unique), an internal uid used by Kubernetes, and the annotations object. It contains one annotation, namely that the current deployment revision is 1. We’ll get to this back later. Each object in kubernetes can have a set of labels, which are key-value pairs.
Next, we’ll take a look at the specification section of the same deployment object.
|
1 2 3 4 5 6 7 8 9 10 11 12 13 14 15 16 17 18 19 20 21 22 23 24 |
apiVersion: extensions/v1beta1 kind: Deployment metadata: ... (covered in previous section) spec: <strong>replicas: 1</strong> <strong> strategy:</strong> <strong> rollingUpdate:</strong> <strong> maxSurge: 1</strong> <strong> maxUnavailable: 1</strong> <strong> type: RollingUpdate</strong> <strong> template:</strong> <strong> metadata:</strong> <strong> labels:</strong> <strong> run: my-nginx</strong> <strong> spec:</strong> <strong> containers:</strong> <strong> - image: nginx</strong> <strong> name: my-nginx</strong> <strong> ports:</strong> <strong> - containerPort: 80</strong> <strong> protocol: TCP</strong> status: ... (covered later) |
The spec (specification) of the deployment has two keys you must set:
- replicas, which describes how many pods this deployment should have. In our case, there will be one only one pod created.
- template, which describes how each pod should look like. It describes a list of containers that should be in the Pod.
The two other keys can be set to customize the behavior of the deployment.
- selector, which determines which pods are considered to be part of this deployment.
- strategy, which states how an update to a deployment should be rolled out.
On to the last part of the deployment object, the observed status that is filled in by Kubernetes, and can only be updated by Kubernetes itself:
|
1 2 3 4 5 6 7 8 9 10 11 12 13 14 |
apiVersion: extensions/v1beta1 kind: Deployment metadata: ... (covered in previous section) spec: ... (covered in previous section) status: <strong>availableReplicas: 1</strong> <strong> observedGeneration: 1</strong> <strong> readyReplicas: 1</strong> <strong> replicas: 1</strong> <strong> updatedReplicas: 1</strong> <strong> conditions:</strong> ... |
Note that the “Replicas” in the key names refers to the number of replicated pods, not number of ReplicaSets. Other points to consider:
- Replicas is simply copied from the spec. This happens asynchronously, so in a very brief interval, you could read a Deployment where the spec.replicas is not equal to status.replicas.
- availableReplicas means how many pods are ready for at least some time (minReadySeconds). This prevents flapping of state.
- unavailableReplicas is the total number of pods that should be there, minus the number of pods that has to be created, or onces that are not available yet (e.g. are failing, or are not ready for minReadySeconds).
- updatedReplicas the number of pods reachable by this deployment, that match the spec template.
- readyReplicas the number of pods that are reachable from deployment through all the replicas (see the picture, trace to all pods from the deployment, through all replica sets).
- observedGeneration is equal to the deployment.kubernetes.io/revision annotation. It is the observed generation.
- conditions is a list of conditions, see next section.
Conditions
Kubernetes uses Conditions in multiple places. They all are a list of condition objects. The minimal condition object contains a type, status and a reason. Potentially a human-readable message, and other fields specific to the resource that the condition object belongs to.
- Type describes what condition it actually is (see detailed explanation below).
- Status can either be “True,” “False,” or “Unknown.” If you’re looking for a condition of type foo, and it’s not in the list, it is considered to be “Unknown.”
- Reason is a CamelCase string, one that is machine readable.
- Message (optional) human-readable message, with potentially some extra details.
A useful analogy might be if you think of Type as the base exception class for e.g. IntegerArithmicErrors, where the Reason could be DivisionByZero.
In our deployment, we currently have one status:
|
1 2 3 4 5 6 7 8 9 10 11 12 13 14 15 |
apiVersion: extensions/v1beta1 kind: Deployment metadata: ... spec: ... <strong>status:</strong> <strong> ...</strong> <strong> conditions:</strong> <strong> - lastTransitionTime: 2017-11-13T11:52:49Z</strong> <strong> lastUpdateTime: 2017-11-13T11:52:49Z</strong> <strong> message: Deployment has minimum availability.</strong> <strong> reason: MinimumReplicasAvailable</strong> <strong> status: "True"</strong> <strong> type: Available</strong> |
It states that “it is Available, because MinimalReplicasAvailable.” In a next blog post, we’ll talk about how we can add enable more conditions that will help us with debugging a problem.
ReplicaSet objects
The ReplicaSet objects that belong to a Deployment can be found by filtering them on the labels of the Deployment. If you scroll back to the metadata section of the deployment, you’ll see that it has one label: run=my-nginx.
Let’s see which ReplicaSets there are, if we filter on that label.
|
1 2 3 |
$ kubectl get replicaset -l run=my-nginx NAME DESIRED CURRENT READY AGE my-nginx-4293833666 1 1 1 3h |
There it is! Now we’ll describe the metadata, spec and status sections separately again (I removed some keys again that are not relevant for this blog post)
The following spec should look relatively familiar now.
|
1 2 3 4 5 6 7 8 9 10 11 12 13 14 15 16 17 |
$ kubectl get replicaset my-nginx-4293833666 -o yaml apiVersion: extensions/v1beta1 kind: ReplicaSet metadata: annotations: deployment.kubernetes.io/revision: "1" ... generation: 1 <strong>labels:</strong> <strong> pod-template-hash: "4293833666"</strong> <strong> run: my-nginx</strong> <strong> name: my-nginx-4293833666</strong> ... spec: ... status: ... |
As you can see, the ReplicaSet has indeed the label run=my-nginx. Not only that, the metadata contains again the deployment revision number. This is how a Deployment knows which ReplicaSet is the current one.
OK, great, now let’s take a look at the spec of the ReplicaSet.
|
1 2 3 4 5 6 7 8 9 10 11 12 13 14 15 16 17 18 19 |
$ kubectl get replicaset my-nginx-4293833666 -o yaml apiVersion: extensions/v1beta1 kind: ReplicaSet metadata: ... spec: replicas: 1 template: metadata: labels: <strong>pod-template-hash: "4293833666"</strong> <strong> run: my-nginx</strong> spec: containers: - image: nginx name: my-nginx ports: - containerPort: 80 protocol: TCP |
This is almost identical to the spec we gave to Kubernetes via kubectl run. I’ll spoil the game by telling that they only change is, is that the Deployment has added a pod-template-hash label. How this is computed is not relevant for now, the important part is that this allows us to know which pods have been created by which ReplicaSet.
I’ll skip the status section of the ReplicaSet; they’re not that interesting. You can look up the keys in the reference manual (see the end of the blog post for links like this).
|
1 2 3 4 5 6 7 8 9 10 11 12 13 |
$ kubectl get replicaset my-nginx-4293833666 -o yaml apiVersion: extensions/v1beta1 kind: ReplicaSet metadata: ... spec: ... status: <strong>availableReplicas: 1</strong> <strong> fullyLabeledReplicas: 1</strong> <strong> observedGeneration: 1</strong> <strong> readyReplicas: 1</strong> <strong> replicas: 1</strong> |
Pod objects
We can find the pods that belong to the ReplicaSet by filtering the pods on the labels in the spec.template.metadata.labels of the ReplicaSet object.
I’ll do something different this time. Instead of running kubectl get twice, I’ll ask it to return all pods which match the labels of the template. This might return more than one result, so we will get back an object-of-kind List, instead of an object-of-kind Pod. As usual, I’ve removed some irrelevant keys from the output.
|
1 2 3 4 5 6 7 8 9 10 11 12 13 14 15 16 17 18 19 20 21 22 23 24 25 26 27 |
$ kubectl get pods -l "pod-template-hash=4293833666,run=my-nginx" -o yaml apiVersion: v1 kind: List metadata: {} items: - apiVersion: v1 kind: Pod metadata: labels: pod-template-hash: "4293833666" run: my-nginx name: my-nginx-4293833666-7krbq spec: containers: - image: nginx name: my-nginx ports: - containerPort: 80 protocol: TCP status: conditions: - status: "True" type: Initialized - status: "True" type: Ready - status: "True" type: PodScheduled |
The labels metadata are exactly as specified in the ReplicaSet template. The name is automatically generated to ensure that is unique.
As you can see, the spec of the containers survived its transition from the template in the Deployment, through the ReplicaSet to the Pod.
Finally, a pod also has a list of conditions in its status section, with names that speak for themselves. The possible types are PodScheduled, Ready, Initialized and Unschedulable. Especially the latter can be interesting during debugging deployment problems. It indicates that Kubernetes could not place the pod in a machine, which could indicate that not enough resources are available (physically available, or allowed to be used).
What’s next?
Now that you know how Deployments, ReplicaSets and Pods are related, you’re ready to read the following material:
- How to debug Kubernetes Deployments
- How Garbage Collection works on Kubernetes
- The reference manual that talks about Kubernetes objects
- Kubernetes deployment strategies
- Want to know more on how to install Kubernetes manually?
Or read one of our other blogs about Kubernetes:
- “Running Habitat Supervisors on top of Kubernetes”
- “Monitoring Kubernetes with DataDog”
- “Running a Secure Registry on Kubernetes“
- “Zoover Goes Cloud Native with Kubernetes”
- “Kubernetes Quick Tip: Whitelisting source IP with Ingress in Kubernetes”